
You can usually find replacement brake pads by searching for the model of brakes installed on your bike. Ensure the pads are the same shape as the ones you are replacing. If not, that is a good sign that they are not compatible. If you are unsure, visiting your local bike shop may be best!
Most of our bikes have dual or quad-piston brake designs. This means that 2-4 cylinders in each brake caliper push the pads together. Knowing which type you have is critical to getting the correct replacement pads. To simplify things, we have created a chart below that has the correct pads for each model, along with replacement rotors.
Pad Types
- The original replacement pads are going to offer standard levels of performance.
- The pads listed in the quieter column will be an organic compound that will grab quicker with more initial braking bite, perform quieter under adverse conditions, and wear out faster.
It is up to each rider to decide which traits they value in a brake pad and rotor.
Please verify by searching the brake brand and model on your personal bike. Verifying the shape is also essential.
**Due to generational changes, the chart below may not be accurate for your bike.
| Bike | Brake Brand and Model | Original Pad | Quieter Pad | Brake Rotors |
| Roadster Gravel | Tektro Aries | E10 Pad | E10 Pad (Organic) | 160mm |
| Roadster V3 | Tektro HD-R285 | E10 Pad | E10 Pad (Organic) | 160mm Front, 160mm Rear |
| Vorsa | Star Union 240PYD | Shimano B05S | Shimano B05S (Organic) | 180mm Front, 203mm rear |
| CF Racer 1 | SRAM Rival | SRAM Pads | SRAM Pads (Organic) | 160mm |
| TrailRush | Tektro Orion HD-M745 | Tektro Q10YS | Tektro Q10RS | 180mm |
| Turris | Zoom HB-875 | Shimano M595 | Shimano M595 (Organic) | 180mm |
| Turris | LBN | Shimano G04S | Shimano G04S (Organic) | 180mm |
| Core-5 | Tektro Aries | E10 Pad | E10 Pad (Organic) | 160mm |
| 500 Series | Tektro Aries | E10 Pad | E10 Pad (Organic) | 160mm |
| 700 Series | Shimano BL-MT200 | E10 Pad | E10 Pad (Organic) | 180mm |
| 700 Series | Tektro HD-E350 | E10 Pad | E10 Pad (Organic) | 180mm |
| Cafe Cruiser | Zoom HB-875 | HB-875 Pad | HB-875 Pad | 180mm |
| LMT'D | Tektro HD-E350 | E10 Pad | E10 Pad (Organic) | 180mm |
| LMT'D | Tektro Orion HD-M745 4-piston | Q11TS Pad | Q11TS Pad (Organic) | 180mm |
| Portola | GA-950E | E10.11 Pad | E10 Pad (Organic) | 180mm |
| Prodigy | Tektro Aries | E10 Pad | E10 Pad (Organic) | 180mm |
| Prodigy | Tektro Orion HD-M745 4-piston | Q11TS Pad | Q11TS Pad (Organic) | 180mm |
| Revv 1 | LBN | Shimano BR-M810 | Shimano BR-M810 Organic | 180mm |
| Revv 1 DRT | LBN (newer FS uses 203 rotors) | Shimano BR-M810 | Shimano BR-M810 Organic | 203mm |
| Rift | LBN | Shimano BR-M810 | Shimano BR-M810 Organic | 180mm |
How To Tell When Brakes Need Replacement
Unlike brakes in cars, bicycle brakes do not have auditory queues built into them to help riders determine when the pads and rotors need to be changed. Direct measurement is often the best way to know; however, many experienced mechanics can often tell just by glancing. The following two images go over what to look for for both pads and rotors to determine if they are worn out. 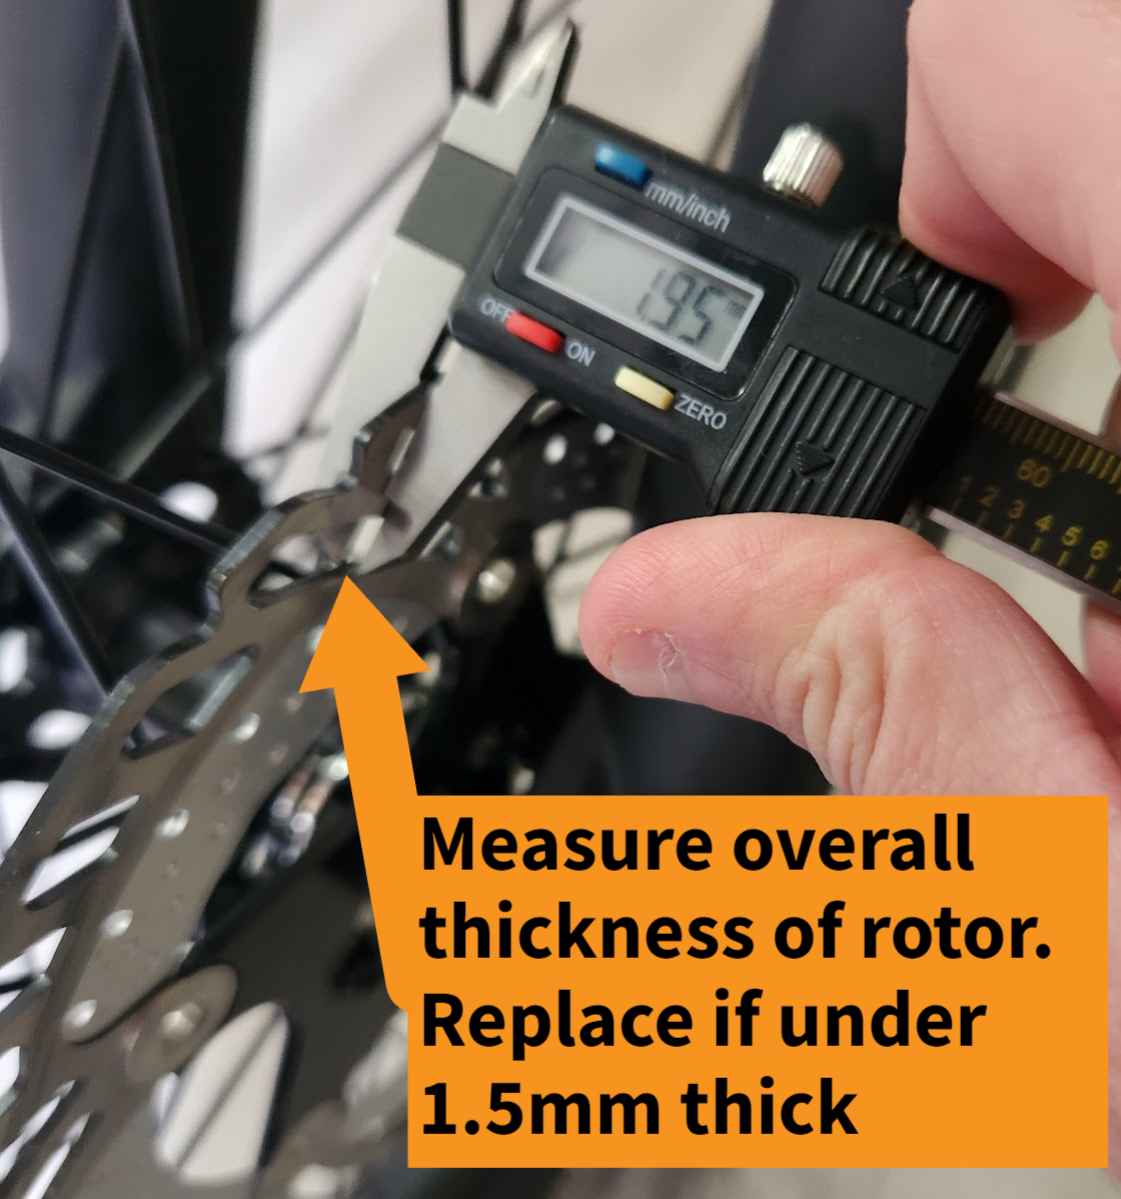

This video from Park Tool explains it very well and may be more than you ever needed to know about brake pads. It will show you how to replace them and discuss the different materials available.
How to Replace The Brake Rotor
- Get the bike ready for maintenance. Turn off the bike, remove the battery, and press and hold the MODE or Power button to discharge any remaining power.
- Flip the bike upside down. Carefully put the bike in a repair stand or flip the bike upside down and rest the handlebar grips on props to protect the display.
- Remove the wheel. Set the skewer and hardware aside.
- Remove the rotor. Use a Torx wrench or driver (typically T25) to carefully remove each of the six bolts. Ensure the bit is fully seated in the bolt head, press firmly, and turn slowly to avoid stripping the hardware. Recycle the old brake rotor according to local rules.

WARNING:
Do not touch the braking surface or the outer ring of the brake rotor that contacts the brake pads. Instead, handle the replacement rotor with the inner rotor arms or with latex gloves. Touching the brake rotor or brake pads with bare skin can also transfer natural oils. Oils or other lubricants can decrease braking performance. We recommend wearing protective gloves when working near the braking system.
- Position the new rotor on the wheel hub. Make sure the new rotor is positioned with the directional arrow toward the front of the bike.
- Thread the new rotor bolts into the hub carefully by hand. Avoid cross-threading or damaging the threads. Use the Torx wrench or driver to tighten each bolt, stopping just before the bolt head contacts the rotor.
- Twist the rotor clockwise so it makes firm contact with the bolts. This will negate any potential shearing force exerted on the bolts in an extreme braking situation.
- Tighten the bolts evenly, moving from bolt to bolt in a star pattern. Torque each bolt to 7nm
- Reinstall the wheel. Carefully align the rotor between the brake pads and fully seat the axle in the frame's dropouts. Use caution to avoid damage to the brake pads. Ensure the wheel mounting hardware is properly and securely tightened.
- Adjust the brake caliper in relation to the position of the new rotor (Centering the Caliper). How to Align a Hydraulic Disc Brake on a Bike
- Complete the bedding-in brakes procedure before your first ride. This process will evenly distribute brake pad material across the new braking surface of the rotor, will increase braking performance, and will help reduce brake noise. Bedding In a Disc Brake
Please reference these articles to assist in removing your rear wheel for the bike being worked on.
- Revv 1 - Revv 1: Rear Wheel Removal
- Roadster V2 Series - Roadster V2 All About The Belt
- All other Ride1Up bikes - How to Remove the Rear Wheel


