
Introduction
Replacing a damaged or inoperational Cadence sensor on the Revv 1 is a simple process. Please follow the instructions below. If the procedure is not followed in order damage to the sensor might occur. Please reach out to us if you have any questions.
TABLE OF CONTENTS
- Introduction
- Tools Required
- Accessing the Controller
- Removing the Crank Arms
- Pulling the Bottom Bracket
- Removing the Sensor
- Installing the Sensor
Tools Required
- T-25 Torx
- BBT-22 Bottom Bracket Tool
- Crescent Wrench
- Wire cutters or Knife
- Zip ties
- 8mm allen Wrench
- Crank Arm Puller
Accessing the Controller
- To replace the cadence sensor first remove the 8 bolts holding the controller cover on:

- Next, unplug the cadence sensor wire from the controller as shown below. It may be necessary to cut some zip ties to gain access to the plug.

Removing the Crank Arms
Next, the crank arms need to be removed from both sides. The following video details the process.
Pulling the Bottom Bracket
Special care needs to be taken to avoid damaging the Cadence sensor or the wire coming out of it. Please reach out to the support team if you have any questions.
- Next remove the non-drive side or left side (as the rider is sitting on the bike) bottom bracket cup using a BBT-22 tool or similar turning counterclockwise with a crescent wrench or similar tool.
Removing the Sensor
After completely removing the cup, gently pull the cadence sensor out of the frame while guiding the cable carefully out of the hole in the frame.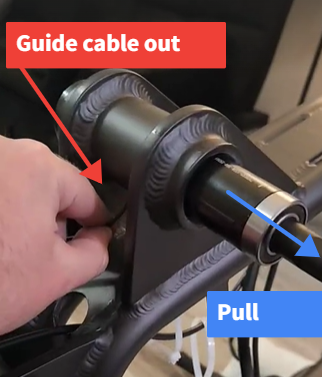
There is generally no need to remove the drive side or right side cup but it's always a good idea to check that it's tight (turn it counterclockwise as it's reverse threaded to tighten). If you do remove it be mindful not to lose the 3mm spacer that is on it and to replace it when installing the cup back into the bike.
Installing the Sensor
Install the cadence sensor in reverse of removal paying close attention to the routing of the cadence sensor cable. The two spines on the outside of the cadence sensor should engage into the drive side bottom bracket cup in a position that allows the cable to route smoothly out of the hole in the frame.
Warning: Damage to the sensor will result if done hastily or in the wrong order!
After ensuring the splines are fully engaged into the notches and the cable is routed without kinks or binds you can install the nondrive side bottom bracket cup and tighten it up.
Once your new cadence sensor has been installed you can connect it to the controller, install your crank arms chain and cover in reverse order, and get back on the road!


