
This article offers instructions on the removal and reinstallation of a Revv1 Taillight. You need an 8mm wrench. One arrived with your bike.
Before You Begin
Turn the bike off and remove the battery to prevent accidental electrical contact.
Place the bike on a stable surface or bike stand for easier access to the rear fender area.
Taillight Removal
Locate the Taillight Assembly
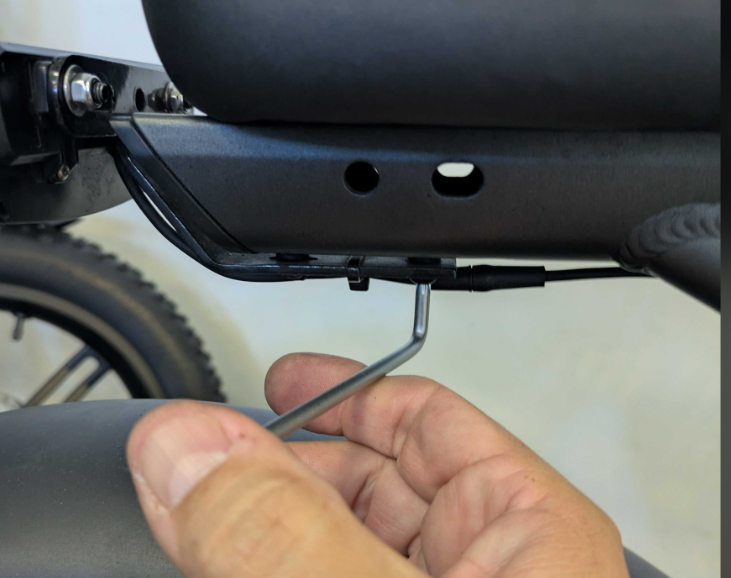
The taillight is mounted to the rear fender just beneath the rack. Follow the wire leading from the light to find where it connects to the main wiring harness.Disconnect the Wiring Connector
Find the small two-pin waterproof connector attached to the taillight wire.
Gently separate the two halves by pulling on the connector ends—do not pull on the wires.Remove the Mounting Nuts
Use the 8 mm wrench to remove the two nuts securing the taillight to the rear fender bracket.
Keep the washers and nuts safe for reinstallation.

Remove the Taillight
Carefully pull the taillight away from the fender, guiding the wiring free of any clips or channels.
The mounting bolts have a sqare flat and sware head that slided into the rear of the headlight. There are 4 slots where these bolts can slide into. When a position is damaged, you can remove the bolt and slide it into a new undamaged slot.

Taillight Reinstallation
Position the Taillight
Align the taillight bolts with the mounting holes on the rear fender bracket.Secure the Mounting Nuts
Reinstall the washers and nuts removed earlier. Tighten both evenly using the 8 mm wrench.
Do not overtighten—the taillight housing should sit firmly but not flex or crack.Reconnect the Wiring
Plug the taillight connector back into the matching connector on the wiring harness.
Ensure the connector is fully seated and that the wire routing follows the original path, clear of the tire or suspension movement.Test the Taillight
Reinstall the battery and power on the bike. Confirm that the taillight turns on with the display and brightens when either brake lever is pressed.
Alternative Method
If the above operation is too difficult, or there is limited space to use the 8 mm wrench to loosen the taillight nuts, you can instead remove the metal bracket the taillight is mounted to:
Locate the metal bracket that the taillight attaches to—it is secured to the rear frame just below the rack.
Using a Torx T25 wrench, loosen and remove the two bolts that fasten this bracket to the frame.
Once the bracket is free, you can easily access the taillight and remove or reinstall it while the bracket is off the bike.
After servicing, reinstall the bracket by tightening the two Torx T25 bolts securely to the frame.
Tips
Check that no wire is pinched or rubbing against moving parts.
If the light does not activate, ensure the connector is fully engaged and the pins are aligned.
A small amount of dielectric grease can be applied to the connector for added corrosion protection.


